As you know, there is this coveted holiday coming up that deems you must buy your honey a present to show how much you love them... maybe you don't actually think that, but c'mon... subconsciously you have been brainwashed by the ridiculous commercials shown this time of the year
I really think I might stop watching TV until after this holiday to avoid "Every Kiss begins with K" getting stuck in my head.
So why not continue the legend of the martyr Saint Valentine and stand up against this highly marketed holiday by baking or making your sweetie something special.
Because the truth is... love don't cost a thing, right?
Well I have put together some items I hope you will enjoy and join me in the baking-making revolution :)
Godiva thrives off making a killing on chocolate covered strawberries...but why not put a little twist on it yourself and make Chocolate Covered Strawberry Cupcakes??

Ok...after seeing the picture you may consider yourself as being the "honey" in your life so yeah... why not treat yourself?? :)
Here's the recipe if you can stand waiting until Valentines!!
Ingredients:
For the Cupcakes
1 (18.25 ounce) package devil’s food cake mix
1 (5.9 ounce) package instant chocolate pudding mix
1 cup sour cream
1 cup vegetable oil
4 eggs, lightly beaten
2 teaspoons pure vanilla extract
1/2 cup warm water
1 (5.9 ounce) package instant chocolate pudding mix
1 cup sour cream
1 cup vegetable oil
4 eggs, lightly beaten
2 teaspoons pure vanilla extract
1/2 cup warm water
For the Buttercream Frosting
3 sticks unsalted butter, softened
pinch of fine grain sea salt
1 tablespoon vanilla extract
2 pounds confectioners’ sugar, sifted
6 ounces strawberries, pureed
4-6 tablespoons heavy cream
pinch of fine grain sea salt
1 tablespoon vanilla extract
2 pounds confectioners’ sugar, sifted
6 ounces strawberries, pureed
4-6 tablespoons heavy cream
Directions:
For the Cupcakes
1. Preheat oven to 350 degrees F. Line muffin tin with paper liners or spray with non-stick cooking spray.
2. In the bowl of a stand mixer, fitted with the paddle attachment, or with a hand mixer in a large bowl, beat together the cake and pudding mixes, sour cream, oil, eggs, vanilla and water. Beat for about two minutes on medium speed until well combined.
3. Using a large cookie scoop, distribute the batter between 24 muffin wells; about 3 tablespoons of batter per well.
4. Bake in preheated oven for 18-22 minutes or until a toothpick entered into the center of a cupcake comes out clean. Allow cupcakes to cool inside muffin tins for about 10 minutes.
5. Remove cupcakes from muffin tins and allow to fully cool on a wire rack. Once cupcakes are cool, prepare your frosting.
For the Buttercream Frosting
1. In the bowl of a stand mixer, fitted with the paddle attachment, or with a hand mixer in a large bowl, cream butter on medium speed until fluffy. Turn your mixer down to low speed and slowly add in the confectioner’s sugar, and continue mixing until well blended.
2. Add salt, vanilla, 3 tablespoons of heavy cream and strawberry puree. Blend on low speed until moistened. Add an additional 1 to 3 tablespoons of heavy cream until you reach the desired consistency. Beat at high speed until frosting is smooth and fluffy
3. Pipe frosting onto cooled cupcakes and finish with a chocolate covered strawberry.
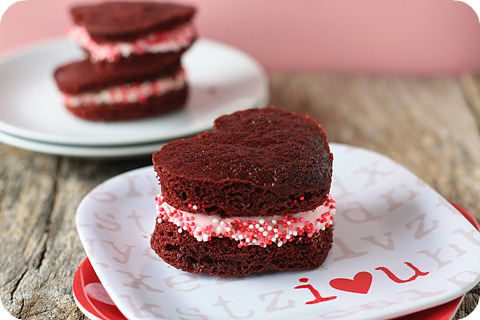
OK, so this holiday is saturated with red and pink decor.
Live it up and make some Red Velvet Whoopie Pies!!
Now I'm realizing writing this post is a little harder than I imagined... I might go into an imaginary sugar coma just from viewing this amount of sweetness... wait, nope. Not Possible. I'm an addict to sugar so I can handle.
Ok, whew. Here's the recipe.
Red Velvet Whoopie Pies
1 tablespoon unsalted butter
1 cup cake flour
1/3 cup unsweetened cocoa (not Dutch process)
1/2 teaspoon salt
2/3 cup canola oil
3/4 cups granulated sugar
1 large egg
2 TBS red food coloring (I used gel dye until I achieved the desired color)
1 teaspoons vanilla
1/2 cup buttermilk
1/2 teaspoon baking soda
3/4 teaspoon white vinegar
Directions
1. Preheat oven to 350 degrees. Place spray foil liners with non-stick cooking spray and place on a cookie sheet.
2. Whisk cake flour, cocoa and salt in a bowl.
3. Place oil and sugar in bowl of an electric mixer and beat at medium speed until well-blended. Beat in egg. With machine on low, very slowly add red food coloring. (Take care: it may splash.) Add vanilla. Add flour mixture alternately with buttermilk in two batches. Scrape down bowl and beat just long enough to combine.
4. Place baking soda in a small dish, stir in vinegar and add to batter with machine running. Beat for 10 seconds.
5. Place 1 tablespoon of batter per foil heart pan
6. Place in oven and bake until a cake tester comes out clean, 10-14minutes. Let cool in pans 10 minutes. Then remove from pans, and cool completely before frosting.
7. Slice the cakes in half and frost the inside with cream cheese frosting. Sandwich the cakes together and decorate the sides with Valentine’s themed sprinkles. I left a few of the cakes whole and sandwiched them together, this made for some BIG whoopie pies!
Cream Cheese Icing
1 (8) ounce package cream cheese, softened
3 tablespoons butter, softened
1 lb confectioners’ sugar
1 teaspoons vanilla extract
1 (8) ounce package cream cheese, softened
3 tablespoons butter, softened
1 lb confectioners’ sugar
1 teaspoons vanilla extract
Using a mixer, blend all of the ingredients together until smooth and creamy and spread between layers.
You can NEVER go wrong with chocolate... NEVER.
Mix it up with making Salted Caramel Brownies

Salted Caramel Brownies
Brownie portion from Alice Medrich | Preparation: Heat oven to 400 degrees F. Cover 8×8 pan with bake spray.
Ingredients:
Brownie:
- 8 tablespoons unsalted butter
- 4oz. unsweetened chocolate
- 1 ¼ cups sugar
- 1 teaspoon vanilla extract
- ¼ teaspoon salt
- 2 large eggs
- ½ cup all-purpose flour
Salted Caramel Layer:
- 1 large egg
- 8 ounces cream cheese, softened
- 1/2 cup salted caramel, homemade (recipe follows)
- 2 tablespoons flour
Homemade Salted Caramel Sauce:
- ½ cup granulated sugar
- 2 tablespoons water
- 2 tablespoons unsalted butter
- 6 tablespoons of heavy cream
- ½ teaspoons of kosher salt
Instructions:
Brownie:
- Place butter and chocolate in a double boiler or a bowl over simmering water. Stir frequently until mixture is melted. Remove chocolate mixture from heat and stir in sugar, vanilla and salt. Add the eggs one at a time, stirring until each is incorporated before adding the next. Stir in flour and beat with a wooden spoon until mixture is glossy about 1 minute. Set aside.
Salted Caramel Layer:
- Add all ingredients in a bowl and mix to combine.
Assembly:
- Measure out ¾ of brownie mixture; set aside. Pour remaining brownie batter into an 11×3 inch pan. Pour salted caramel mixture on top. Pour ¾ cup of brownie on top. Using a skewer softly pull brownie and salted caramel mixture in circular motions throughout the top to create a swirling pattern on top. Bake for 20-25 minutes, or until the brownie starts to pull away from the sides of pan.
- While brownies are baking prepare ice bath. Fill a pan with ices cubes and water ¾ inch deep (yes, this really does help the brownie). When the brownies are done baking, remove the pan from the oven and place it in the water bath. Allow brownies too cool completely in the water bath.
Homemade Salted Caramel Sauce:
1. Add sugar and water into a saucepan over medium low heat. Stir until sugar has dissolved. Use a wet brush to remove any crystals that form on the side. Once sugar has dissolved increase heat to high. Now and then, using the handle give the pot a swirl to keep the mixture moving. Do not stir the mixture directly. The mixture will start to bubble after a minute. As the mixture darkens to a medium amber color, approximately 5-7 minutes, add the butter and cream to saucepan. The mixture will bubble wildly. Whisk to combine (bubbles will subside upon cooling). Add salt and stir to combine.
Ok, really. This is the last. Food Coma might be for real!!
As for my hubby, he has a thing for donuts...chocolate...and yes beer.
Interesting combo but hey, I love him :)
Chocolate and Beer filled Donuts

Chocolate and Beer Filled Donuts
Makes 12 Donuts
* 2 tablespoons active dry yeast
* 1/2 cup warm water (110 degrees)
* 1/4 cup sugar, plus more for rolling
* 2 1/2 cups all-purpose flour, plus more for dusting
* 2 large eggs
* 2 tablespoons unsalted butter, room temperature
* 2 teaspoons salt
* 3 cups vegetable oil, plus more for bowl
* 2 egg whites, lightly beaten
* One batch of Chocolate Beer Truffles, or a chocolate of your choice
Instructions:
1. In a small bowl, combine yeast and warm water. Set aside until foamy, about 5 minutes.
2. In a food processor fitted with a blade, combine yeast, ¼ cup sugar, flour, eggs, butter and salt and process in two-second bursts three times or until combined (dough will be sticky). Place dough in an oiled bowl and turn a few times to coat; cover with plastic wrap and refrigerate overnight.
3. Remove dough and let rest at room temperature for 30 minutes. Turn dough onto a lightly floured work surface, roll dough to 1/4-inch thickness. Use a 2 inch-round cutter or a drinking glass and cut 20 rounds. Place chocolate in the center and brush edge with egg whites. Place another round on top and press edges together to seal. Continue until all rounds are finished. Cover with plastic wrap; let rise 15 minutes.
4. Fill medium saucepan with vegetable oil over medium heat. Heat oil until a deep-frying thermometer registers 360 degrees. Using a slotted spoon, add 3 donut rounds into oil. Fry until golden, about 40 seconds. Turn doughnuts over; fry until golden on other side, another 40 seconds. Transfer to a paper-towel-lined baking sheet. Roll in sugar while warm. Continue until all rounds are cooked
A few notes:
1. To shortcut this recipe you can use store-bought buttermilk biscuits instead of making your own dough. There will be a slight difference in taste and texture. But I made one version this way to compare and they are quite good.
2. To shortcut the center, place any piece of chocolate candy bar or truffle you like — your palate, your preference.
3. Donuts are best eaten the same day.
So if you don't have a sweetheart in your life right now please don't go off singing about your achy breaky heart... just treat yourself!! :)
If you do have a sweetheart then treat yourself and your love! :)
Have a super wonderful Valentines Day filled with sweetness!!!!!!!!!!!
No comments:
Post a Comment